Get started
Installation and start
dotPeek is available for download in two distributions: as a part of dotUltimate installer and as portable versions for 32-bit and 64-bit processors. Both distributions are functionally equivalent.
The installer-based distribution is a safe bet if you want to use dotPeek on a single computer and take advantage of automatic version management.
The portable distribution is a better fit if you prefer to share dotPeek between multiple machines - for example, using a flash drive or Dropbox folder.
Basic preferences
In dotPeek, you can control everything with shortcuts. Note that dotPeek provides two keyboard schemes inherited from JetBrains ReSharper. First of all, you may want to study the shortcuts assigned to dotPeek commands in both of these schemes. As soon as you choose, which scheme you prefer to use, select these scheme on the page of dotPeek options. As you study these help pages, you can choose your preferred scheme on the top-right corner of the page so that shortcuts from this scheme are displayed to you.
You can quickly configure code viewer preferences - such as whether to wrap long lines or display line numbers - in the and menu.
Besides decompiling library code, by default, dotPeek automatically finds, fetches, and displays original source files if they are available locally or on a symbol server. If you want to see only decompiled code, clear the Use sources from symbol files when available checkbox on the page of dotPeek options.
Open assemblies
To start working with any assembly, you need to open it in the Assembly Explorer. When you launch dotPeek for the first time, you will see that main system assemblies are already loaded into this window. If necessary, you can load more assemblies you want to explore - click Open ![]() on the Assembly Explorer toolbar and then select an assembly file, or just drag assembly files to the Assembly Explorer window.
on the Assembly Explorer toolbar and then select an assembly file, or just drag assembly files to the Assembly Explorer window.
Browse assemblies
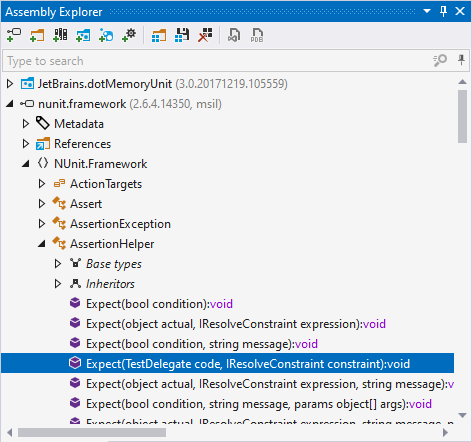
As soon as the desired assembly appears in the Assembly Explorer, you can start studying its contents by successively expanding nodes displayed under the assembly: namespaces, types and delegates, and type members.
You can double-click types and type members to display decompiled code (or code from original source files if they are available) in the code viewer.
Under assembly node, you can also find the References and Resources nodes. Double-clicking a reference loads the referenced assembly, if immediately available; double-clicking an entry under the Resources node opens the source representation of the corresponding resource in the code viewer, or passes it to an external application.
Under type and delegate nodes, you will see the Base types node that can be expanded to show base types and inheritors of the current type. This is a way to browse type inheritance trees that developers with .NET Reflector background usually find appealing.

View source code
Assembly code is presented as C# in the Code Viewer, which displays source or decompiled code in multiple tabs. Code syntax is highlighted ReSharper-style, with distinctive colors for properties, types, accessors, and methods. When you place the caret at a delimiter, be it a brace or parenthesis, it gets highlighted along with its counterpart, bringing focus to the scope of the particular code block you're in.
If you need to copy some code, you can select the desired piece with Extend/shrink selection shortcuts Control+W/Control+Shift+W or with the Select containing declaration shortcut Control+Shift+[.
For more information about symbols without opening their declarations, use the quick documentation command Control+Q.
Navigate and search
There are plenty of ways to search code with dotPeek. In most of the cases, you can use the Search Everywhere command Control+N — it will bring you to assemblies, types, and type members from the scope in a few keystrokes. When you specify a symbol to search, use CamelHumps — enter only uppercase letters of compound names.
Among the wealth of navigation commands, the most helpful is Go to Declaration Control+B, which is also available with Ctrl - clicking on symbols. If you invoke this command on a usage of a symbol, you will land on its declaration, if you do this on the declaration itself, you will be able to iterate over all symbol usages in the scope.

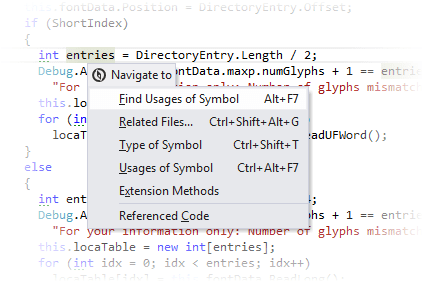
To see all navigation commands available for the current caret position, use the Navigate To command .

Another command that you can use after you found the desired symbol — Locate in Assembly Explorer Alt+Shift+L - will help you understand to which assembly, namespace, type, and so on the symbol belongs to.
Advanced features
dotPeek is much more than a decompiler thanks to its advanced features. With dotPeek, you can also:
Generate Visual Studio projects and PDB files from assemblies.
Explore relation between types with type hierarchy and type dependency diagram.
Debug compiled assemblies using dotPeek as a symbol server.